Core Web Vitals is a new standard introduced by Google to measure overall page experience.
It’s a way for webmasters to assess their website’s performance and optimize it for a better user experience.
By also taking into account the page loading speed, this standard demands high-performance standards on the website.
Table of Contents
- The R.O.S.E Mechanism
- Step #1:Reduce as many Assets Files as possible to make your website lighter
- Technique #1: Combine your non-critical JavaScript files into one, and delay its execution to eliminate JavaScript render-blocking.
- Technique #2 – One simple hack to eliminate CSS render-blocking
- Technique #3 – Lazy-load your images
- Technique #4 – Disable Google Fonts
- Technique #5 – Don’t use Icon Library
- Technique #6 – Preload Fonts files
- Technique #7 – Remove WP Emoji
- Summary
- Step #2: Optimize Your Initial Server Response Time
- Step #3: Simplify your “Above The Fold” content
- Step #4: Eliminate Unexpected Layout Shifts
- Frequently Asked Questions
- Conclusion
In this lesson, I will show you a system that can help you optimize your WordPress site for Core Web Vitals.
The R.O.S.E Mechanism
This is the same system that I used to turn a poorly configured Elementor site into one, which passed the Core Web Vitals standard with flying colors.

The R.O.S.E Mechanism is made up of a 4-steps process that, if implemented, will help you optimize your WordPress site for speed and performance:
- Step #1: Reduce as many Assets Files as possible
- Step #2: Optimize Your Initial Server Response Time
- Step #3: Simplify your “Above The Fold” content
- Step #4: Eliminate Unexpected layout shifts
Each of these steps is made up of multiple techniques to help you achieve the objective.
So, let’s dive into the details of the first step:
Step #1:
Reduce as many Assets Files as possible to make your website lighter
As I have mentioned in the previous lesson (Why is WordPress loading so slow?), the more resources a browser has to load, the longer it takes for your website to load.
This is why reducing as many asset files (CSS, JS, fonts) as possible is vital to optimizing your WordPress site for Core Web Vitals.
Let me give you an example: if you look at the screenshot below of a WordPress website with all the assets files listed, do you see how many files are loading?
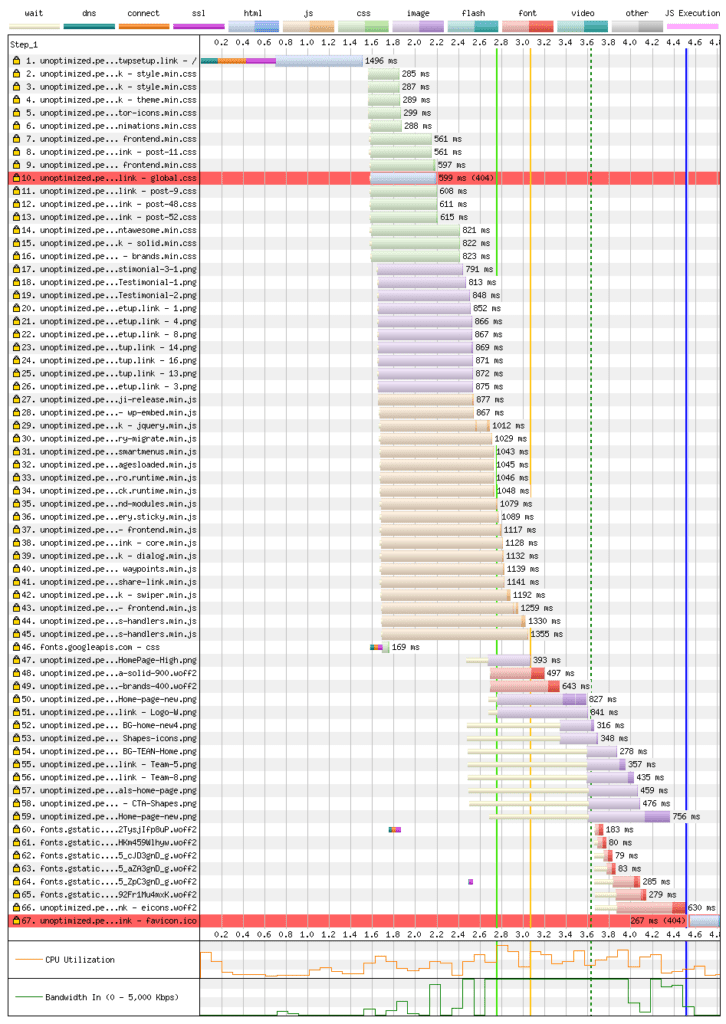
A LOT!!!!
Suppose you measure your website with GTmetrix under the Page Details section. In that case, you should see how big your page size is (in KB) and how many requests your page is making (AKA how many files a browser needs to load).
The main goal here is to reduce your page size to around 150kb ~ 250kb and not more than 15 items in your page request.
I know – this might seem impossible for a WordPress website, but trust me when I say that it’s not.
Here are the techniques that will help you reduce your assets files as much as possible:
Technique #1: Combine your non-critical JavaScript files into one, and delay its execution to eliminate JavaScript render-blocking.
The first thing you want to do is combine all your JS files into one.
To do this, simply install Autoptimize plugin into your WordPress site, and activate it.

Once it’s activated, go to Autoptimize settings page, under the JavaScript Options section, enable both Optimize JavaScript Code & Aggregate JS-files options:

Make sure you exclude critical JavaScript files, such as jquery,min.js, or lazy-load.min.js, from being combined into the bundle. If you don’t do that, it will cause JavaScript errors and create user experience problems.

Then, go to Misc Options section, make sure you untick the Also optimize for logged-in editors/ administrators option.
You don’t want to see a cached copy of your CSS & JavaScript files when editing the website.
Once you are finished, go to the bottom of the page and click Save Changes and Empty Cache:

To see if it works, simply open your website in Chrome incognito mode, and then Right Click -> View Page Source. Scroll down to the bottom, and you can see that all of your non-critical JavaScript has been merged into a single file.

Next, we need to decide how we will delay the execution of this combined JavaScript file.
Delay JavaScript Execution is a technique in which the execution of JavaScript code is delayed until a user interaction is detected.
This prevents JS files from render-blocking while the browser loads content, thus improving a website’s loading time.
There are 2 plugins you can use to delay JavaScript files’ execution.
Plugin 1 – WP Rocket (premium plugin)
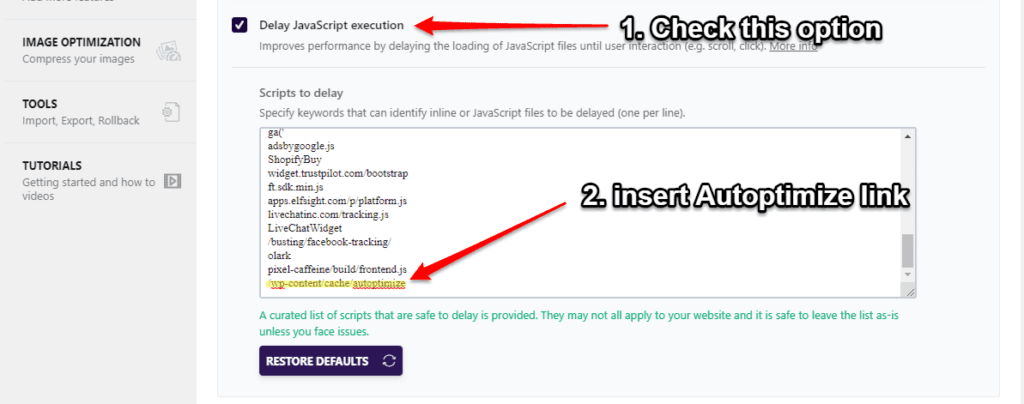
If you have WP Rocket installed on your website, simply go to WP Rocket settings page > File Optimization, tick the Delay JavaScript execution option, then insert /wp-content/cache/autoptimize into the “Scripts to delay” text box:
Plugin 2 – Flying Scripts by WP Speed Matters (Free plugin)
If you don’t have WP Rocket, you can use Flying Scripts by WP Speed Matters. It’s free, and you can download it from the WordPress repository.
Once you installed and activated the Flying Scripts plugin, go to its settings page (Settings > Flying Scripts), and insert /wp-content/cache/autoptimize into the Include Keywords box. Then, change the Timeout option to Never.
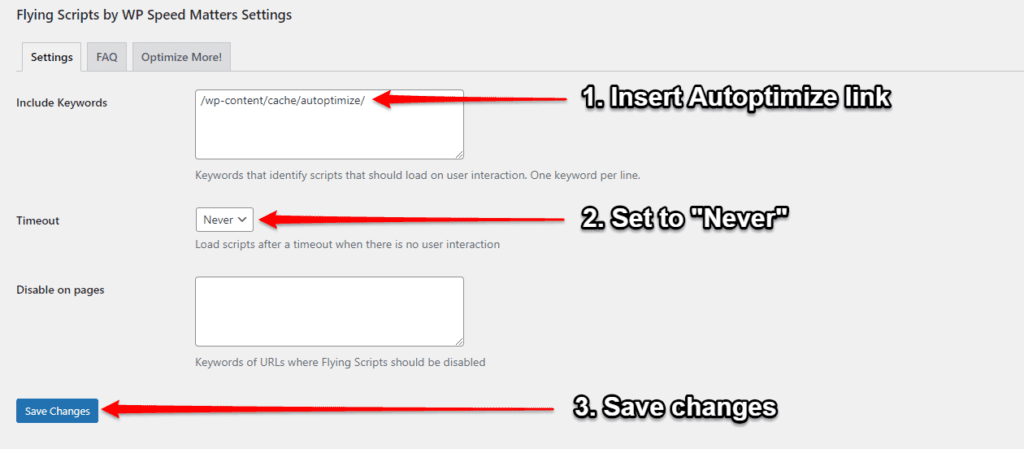
Once you’re done, Remember to click Save Changes and delete your Autoptimize cache.
Now – if you use Gtmetrix to measure your website again, you should see only your critical JavaScript files are loaded in the waterfall tab.

You should see a boost in both GTmetrix and Google’s PageSpeed Insights score.
Why it works
By default, a browser will need to load all JavaScript files before it displays the web page.
By delaying all your non-critical JavaScript, you essentially reduced the total page request by at least 10-20 files.
Hence, the site will load much more quickly.
The best part?
The JavaScript codes still run as usual, and it won’t break your website, which is fantastic.
No more dequeuing JavaScript files one-by-one from your WordPress site 😛
Next – we need to spend some time optimizing your CSS.
Technique #2 – One simple hack to eliminate CSS render-blocking
There are lots of techniques for CSS optimization.
From compressing & minifying CSS files to generating critical CSS, most of these techniques can help speed up rendering your web page.
You probably read about them in the past, and you probably tried at least one of them yourself.
However, the method I’m going to show you is very unorthodox, and it comes with a caveat.
So – here’s is it:
Go back to Autoptimize settings page, under CSS Options, tick the following options:
- Optimize CSS Code
- Aggregate CSS-files
- Also aggregate inline CSS
- Inline all CSS
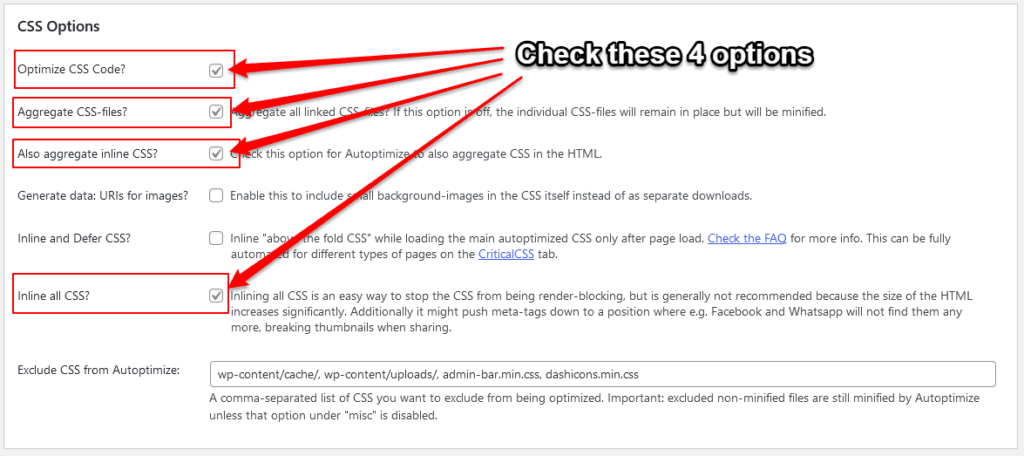
By doing this, Autoptimize will compress, minify, and inline all your CSS into the HTML code.
Yes – you read it correctly.
I did say, “Inline all your CSS into the HTML code.”
Inline CSS into HTML is considered bad practice for web development.
However, in our case, by in-lining all the CSS into HTML code, we basically remove all the CSS files from page requests. Thus, preventing it from render-blocking the website content.
Note: What is Render-Blocking?
A render-blocking resource is any resource that blocks the browser from painting a web page until that resource is loaded. This can be anything from a script, to images, to CSS files.
This is probably the easiest method to solve all the CSS render-blocking issues.
In fact, if you do this, you don’t need critical CSS anymore – since all your CSS is already on the page.
But, as I said before, this unorthodox method is not perfect (that’s why it’s unorthodox).
By in-lining all the CSS, you make your HTML code significantly larger. This may consequently lead to another problem: slow server response.
Since your HTML code is more extensive, It will take more time for the browser to load.


Therefore, It’s crucial to dequeue or remove unused CSS before in-lining all your CSS code into HTML.
As long as your initial server response time wasn’t greater than 1 second, you are good to go.
Anyway, if you want to use this method to eliminate CSS from render-blocking your content, be sure not to remove anything from the “Exclude CSS from Autoptimize” textbox and leave the predefined value unchanged.
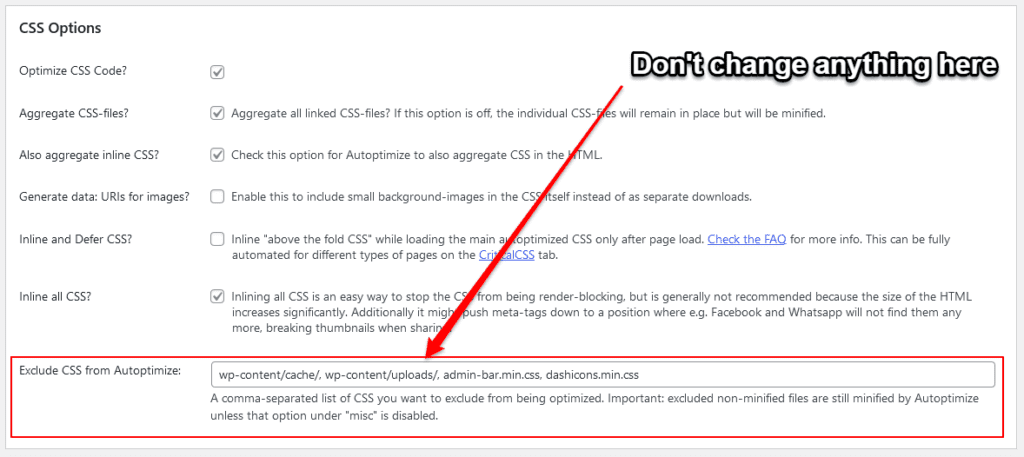
Note: You can add your own list if you want – just don’t remove any of the predefined values.
Technique #3 – Lazy-load your images
Lazy-loading images is a technique that only loads images when the user views them and not during page load.
This is done to reduce your web pages’ overall size and subsequent server requests.
Here’s why this is important:
When the page loads, most of the “Below-The-Fold” content (like text and images) are usually not in view.
Hence, there’s no need for a browser to load them immediately.
For example: if you visit this page on Twitter (https://twitter.com/csswizardry), you will notice that the browser will take about a few seconds before showing you images from Twitter posts.
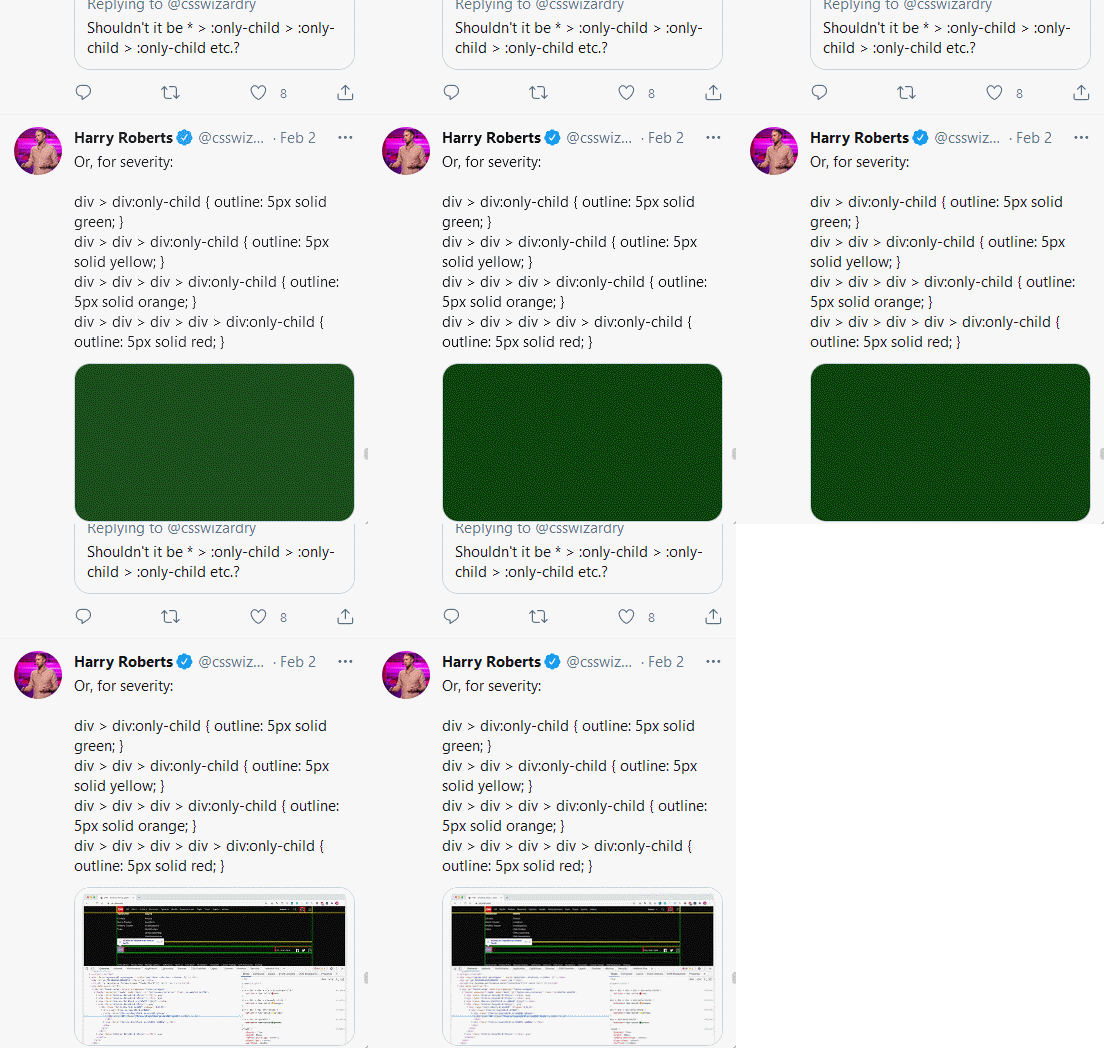
However, once those images are in view, the browser will fetch them immediately.
This is lazy-loading in a nutshell.
The site will still load without any issues despite the delayed loading of images.
As long as your browser can render the main page within 1 second, it doesn’t matter if you miss some content during the initial load.
Therefore – if you lazy-load images, your images will only load when needed.
As a result, no more render-blocking images (which can slow down page load time), and users will be able to browse your website more efficiently.
Since the image is not within your user’s viewport, it won’t impact your LCP score.
That’s why lazy-loading images are essential to optimizing a WordPress site for Core Web Vitals.
Like inlining all CSS files into HTML code before, lazy-loading images are just another tactic to reduce render-blocking delays and remove as many files as possible from the initial page load request.
For lazy-loading images, You can use:
Option #1 – WP Rocket
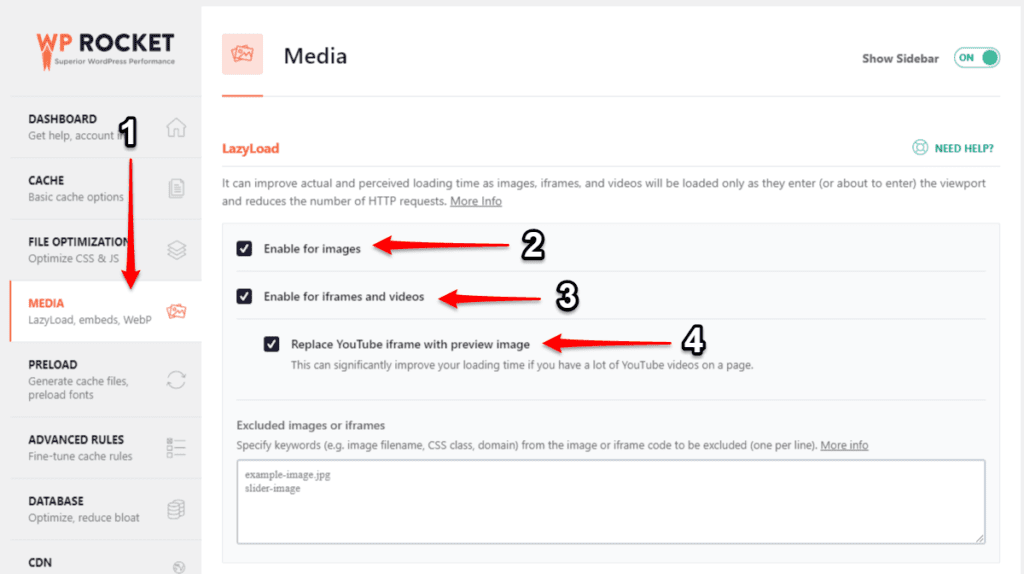
Just go to WP Rocket settings page > Media, and tick the following options:
- Enable for Images
- Enable for iframes and videos
- Replace YouTube iframe with preview image
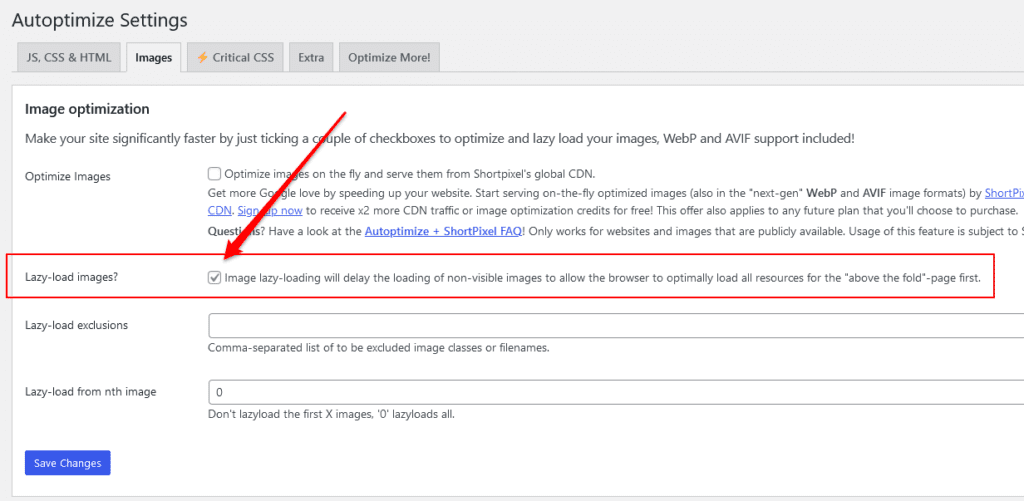
Option #2 – Autoptimize
Just go to Autoptimize settings page > Images, and tick the Lazy-load images option:
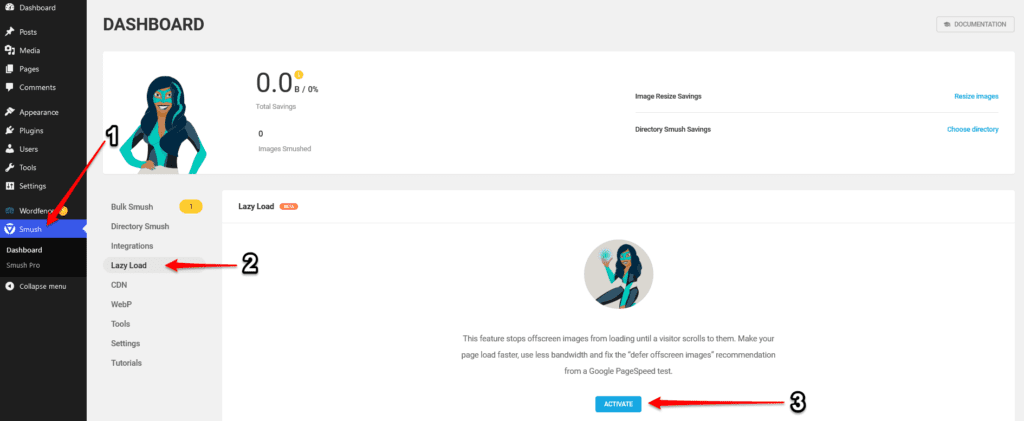
Option #3 – Smush – Lazy Load Images, Optimize & Compress Images
Go to Smush Settings page > Lazy Load, and click the Activate button.
Technique #4 – Disable Google Fonts
If you use Google Fonts in your WordPress site, you might want to consider disabling it and going with the default system fonts instead.
Google Fonts can slow down your website, and it can affect your LCP and CLS score.
This is because they are hosted on Google’s servers, meaning that it takes a lot longer for the fonts to load. This delay in loading can slow down the rendering of your page.
By disabling Google Fonts and use the default system fonts, you can remove external fonts from render-blocking your content. This means the browser no longer has to wait for the fonts file to be fully processed before it can paint your page content.
To disable Google Fonts, go to Autoptimize Settings page (Settings > Autoptimize), and select the Extra tab.
Under the Google Fonts option, select Remove Google Fonts.

After disabling Google Fonts, you need to include the system fonts into your CSS.
To do that, simply go to WordPress Customizer (Admin Dashboard > Appearance > Customize) and insert the following CSS into the Additional CSS section.
body {
    font-family: -apple-system,BlinkMacSystemFont,"Segoe UI",Roboto,Oxygen-Sans,Ubuntu,Cantarell,"Helvetica Neue",sans-serif;
}
Technique #5 – Don’t use Icon Library
In the previous lesson, I mentioned that Bloated Icon libraries, like Font Awesome, make the page size bigger.
Instead of using icon library, you should use its SVG or PNG version instead. This will prevent the bloated icon files from slowing down your website.
Please refer to my previous lesson on how to replace Font Awesome CSS with SVG icons.
Technique #6 – Preload Fonts files
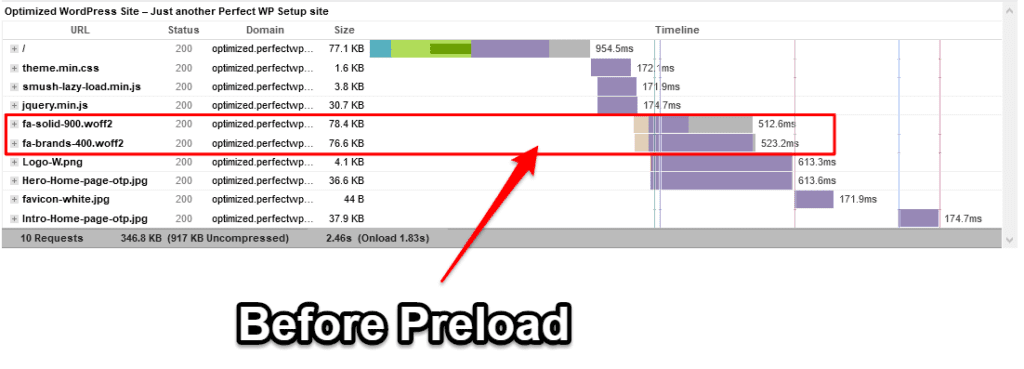
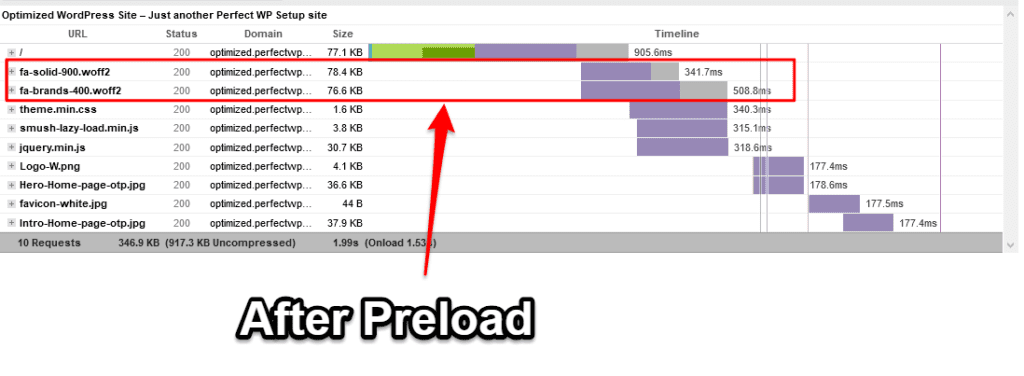
If you really need to use Google fonts or Font Awesome library for your website, you should preload these font files.
By doing this, the browser will prioritize these font files and load them early.
To preload Google fonts, go to Autoptimize settings page (Settings > Autoptimize), and select the Extra tab.
Under the Google Fonts option, tick Combine and link deferred in head.

As for the Font Awesome library (or any CSS-based icon libraries), first, you’ll need to identify the full URL of your Font Awesome font files.
You can get it from the waterfall model in GTmetrix results page:

Then, go back to Autoptimize settings page (Settings > Autoptimize), select the Extra tab, look for Preload specific requests option, and insert the URL into the box.

Preloading font files can make your website load a little bit faster.
However, it’s important to remember that preloaded fonts still need to be rendered after loading.
This means it might cause some minor layout shifts when it’s finally rendered.
So, my advice is to remove it entirely if you can.
Technique #7 – Remove WP Emoji
If you’re not a fan of the emojis, I suggest you disable them.
This is because WordPress will load additional styles and scripts to render emojis.
The goal here is to remove as many asset files as possible.
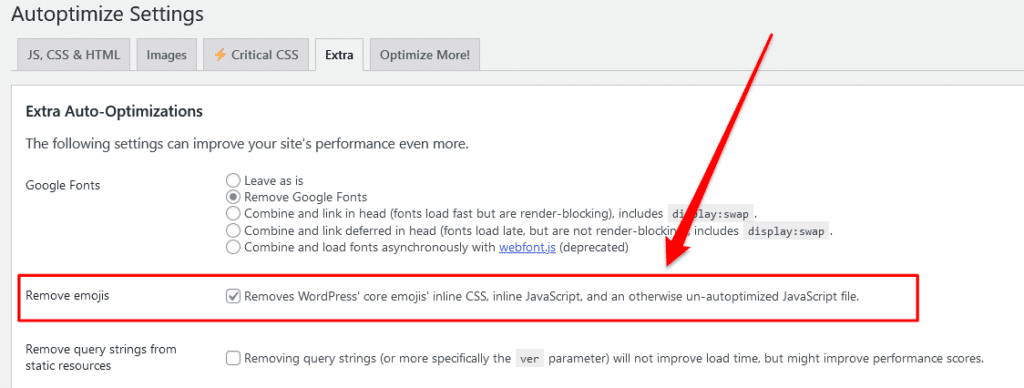
Suppose you don’t use emojis in any of your website contents. In that case, you can remove it by going to Autoptimize settings page (Settings > Autoptimize) and select the Extra tab.
Under the Remove emojis option, tick the box:
Summary
If you have done everything correctly, there should be a vast improvement in your website’s Core Web Vitals metrics.
It’s important to mention here that not all the techniques will work with all kinds of sites.
You don’t have to include every one of them in your optimization strategy.
Just pick the one that suits you most.
But, being said that, you should at least try it out first before you come to any conclusion.
In my opinion – it’s the combination of all these techniques that make it work.
The primary purpose here is to remove as many assets as possible from your website.
As long as you can minimize your page request to not more than 15 items, and your page size is around 150kb ~ 250kb, you are good to go.
As it will ensure that your website, in terms of rendering speed, and Google’s PageSpeed insights scores will be significantly higher.
Step #2:
Optimize Your Initial Server Response Time
Whenever you input a URL into a browser, the browser will send a request to the server that hosts the website. The server will then generate a response sent back to the browser.
Based on that response, the browser will give you a visual representation of the website.
This process is known as rendering, and for that reason, the time it takes the server to respond to an HTTP request is known as initial server response time.
Therefore, a faster response will improve your website’s load times and user experience.
However, on the other hand, a slower server response time can makes your website run slowly and end up with a low LCP score.
Several things can affect poor server response time:
- Server configuration – If your server were configured poorly, the connections would take longer to process.
- Code execution – A poorly written large time-sucking script or a poor code architecture can significantly slow down the rendering of your site.
- Number of simultaneous connections – If you have many users on your website, more resources would need to be allocated to every user. This means a much longer waiting time for them to complete their requests.
- Location of the server – If your server is far away from your users’ location, it can take longer for the request to reach their computer.
There are many ways to optimize your server for performance, but I will just share the most crucial one.
Technique #1 – Use better hosting with HTTP/2 support
HTTP/2 is a vital revision of the HTTP network protocol that makes the web faster, more efficient, and secure.
It is a protocol standard developed to address and optimize the HTTP 1.x protocol’s shortcomings.
One of the critical improvements in the HTTP/2 protocol is the more efficient use of TCP connections.
It also allows for concurrent connections to be handled by a single TCP socket instead of one-connection-per-socket, which speeds up the process drastically.
There are some other improvements in HTTP/2, such as
- Making header compression optional
- More efficient handling of cases where multiple requests can be satisfied with a single response
- Elimination of unnecessary latency associated with head-of-line blocking issues plagued earlier HTTP 1.x protocol implementations due to its single-threaded nature.
In short, an HTTP/2 enabled Server will support faster load-times and a much less resource-intensive way of making requests.
Here’s an example of how CSS files are loaded under HTTP 1.x protocol:

In HTTP 1.x protocol, CSS files are loaded one by one, which results in a longer waiting time.
Whereas, with HTTP/2 protocol, CSS files are loaded concurrently, resulting in less waiting time for the user:

For this reason, HTTP/2 is generally considered to be a much more efficient protocol.
A server with HTTP/2 support streamlines the rendering process and significantly improve website loading speed and user experience.
Needless to say, if you want to optimize your server response time, use a quality hosting provider.
If you’re still using shared hosting, you might want to consider switching to managed cloud hosting, like Cloudways, if you wish to have better performance.
Shared hosting is not designed for high performance and often slow because it shares those resources with other sites on the same server.
If one site generates a lot of traffic, it will eat up a lot of bandwidth and cause other sites on the same server to be really slow.
But, with cloud hosting, you have dedicated resources that will be allocated to your site only.
That means less congestion and more control over the resource allocation on your site.
A well-managed cloud hosting (like Cloudways) will provide you with an optimized server configuration.
A better server configuration would mean a much faster response time because it doesn’t need to spend as much time processing the requests.
Furthermore, your server would have a better response time if they are a lot closer to your users’ location.
If you really want better speed and performance for your website, you must switch to a cloud-based server.
Technique #2 – Remove plugins you don’t need
Since WordPress is an open-source CMS, there are many plugins and themes that can be installed.
However, you need to be careful when installing them because some of the plugins can actually cause performance problems and slow down your server response time significantly.
Therefore, it’s essential to remove any unused plugins that you don’t need from your server to improve your site’s performance and speed.
Now – I know you might be thinking, “what if I need those plugins in the future?”
Well, you can always install them back later when you need to.
A good rule of thumb here is to uninstall any plugins if you haven’t used them for 30 days. It’s not going to hurt your website and may actually help your site performance.
Technique #3 – Use a Good Caching Plugin like WP Rocket
Regardless of how powerful your server is, an excellent caching plugin can always help in reducing your server response time.
A caching plugin essentially stores static versions of your WordPress website’s content so that it can be served to the user immediately.
This means that all of your visitors will be able to access your website much faster. Since they no longer need to wait for the servers to generate content every time they visit your site.
This will make your site load much faster because most heavy lifting is already done in advance.
And the faster your users see the website, the better they like it.
Here are the examples of how an excellent caching plugin can help you optimize your server response time:


A great caching plugin that I personally use is WP Rocket because it provides a ton of advanced features and is super easy to use.
There is some black magic with WP Rocket that makes everything relatively faster and easier to use.
Not to mention, they work very well with other plugins too.
However, if you’re looking for a free alternative, I recommend Cache Enabler.
This free WordPress plugin is developed for the specific purpose of reducing server load and response time. It has a simple interface and doesn’t come with any distractions.
This plugin solves loading problems by caching the server content on your page to be served to your users immediately without making any request to your server.
This, in turn, gives you a lot faster loading time for all your visitors, which is better for their experience and makes them want to come back again more often.
However, I need to emphasize that Cache Enabler is NOT a direct replacement for WP Rocket.
WP Rocket is much more advanced, with a host of sophisticated features that can improve all aspects of your site.
On the other hand, Cache Enabler is simple and just so you have the feel of what a caching plugin can do for your site.
If you are serious about having the best performance for your WordPress website, I would recommend using WP Rocket.
However, if you’re looking for a free alternative to WP Rocket, which doesn’t come with too many fancy features, I would recommend using the above-mentioned Cache Enabler.
Regardless, both plugins are compatible and work well with Autoptimize.
Technique #4 – Database Clean-up
Let me be clear that most WordPress sites usually don’t have any database issues that would significantly affect your site’s performance and speed.
While the database size on your site can directly correlate to the server response time, it only applies if you have a really large database from years and years of publishing.
Thus, you don’t need to regularly optimize and clean up the database on your WordPress website for a faster server response time.
Regardless, it’s still a good practice to do a database clean-up from time to time to make sure your database is optimized correctly.
Here’s a plugin you can use to optimize your database: Advanced Database Cleaner
Note: If you already have WP Rocket installed on your site, then you can use WP Rocket to optimize your database instead.
Summary
In short, if you use well-managed cloud hosting with an adequately optimized server configuration (like Cloudways), you already won half the battle in terms of reducing server response time.
The other half is to further optimize your site’s configuration and functionality.
For example, removing any unused plugins from your site, optimize your database if necessary, and use a good caching plugin.
If you implement all the techniques correctly, you should see a faster server response time for your WordPress site.
Your content would load much faster than before. That will translate into more visitors spending more time on your site, resulting in more conversions.
Step #3:
Simplify your “Above The Fold” content
As I have mentioned in the Core Web Vitals lesson, your LCP score is depending on how fast your site can serve the “Above The Fold” content to the users.
If you have follow-through the techniques in the first 2 steps (Reduce & Optimize) perfectly, you should already see a significant improvement in your Core Web Vitals metrics.
What you need to do next is just simplify your “Above The Fold” content so that you further improve your LCP score.
There are 1 “Do” & 2 “Don’ts” when it comes to simplifying your “Above The Fold” content.
Let’s get started with “Don’ts” first:
Don’t #1 – Don’t put any JavaScript-driven content in your “Above The Fold” section
Content that relied on JavaScript to work (like slider, carousel, animation effect) not only can cause unexpected layout shifts to your website but also can result in a poor LCP score.
For example: If you have a slider in your “Above The Fold” section, the slider will not be loaded until all your JavaScript files have been processed and executed.
This will make your LCP element’s loading time much longer, resulting in a significant drop in the LCP score.
This is not the only issue with sliders.
Sliders often result in a layout shift that will increase your overall CLS score.

Another reason why you shouldn’t use JavaScript-driven content in your “Above The Fold” section is because it will make your page look cluttered and unprofessional.
For the sake of a good user experience, it is best to keep your “Above The Fold” section clutter-free.
So if you want to optimize your WordPress site for Core Web Vitals, never put JavaScript-driven content in your “Above The Fold” section.
Don’t #2 – Don’t put more than 2 images in your “Above The Fold” section
Ideally, you should have only 2 images in your “Above The Fold” section:
- Your website logo
- Your hero image
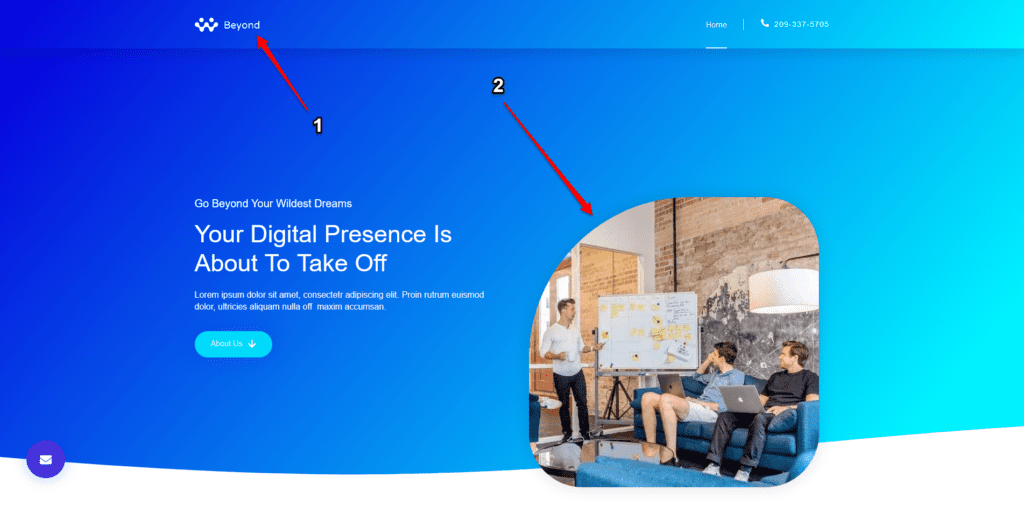
The more images you have in your “above the fold” section, the heavier your load will be.
While you can lazy load those images, but it won’t improve your LCP score – since they are already within the user’s viewport.
Thus, it’s best to use as few images as you can in the “above-the-fold” section.
“What about background images?”
Any background images should be included in the count as well.
This means if you use a background image for your hero section, then the other image should be your logo and nothing else.
Having just 2 images in your “Above The Fold” section will make a big difference to your LCP score.
Do #1 – Compress & Optimize all your images in your “Above The Fold” section.
You must compress your image file size (especially if your image is in PNG format)!
You can either manually compress your images using a free online tool, TinyPNG or plugins like ShortPixel or Smush.
Personally, I always compress my images manually first (using TinyPNG).
Then, only I upload the compressed version to WordPress. So that the [Smush Pro] plugin I’ve installed on my site can further compress and optimize it again.
The reason behind this is because I need to make sure that the quality of my images is still good when I do manual (the first round) compression. So that if somehow they become pixelated, I don’t have to repeat the cycle of deleting and reuploading it back to my site again.
Note: This is just a personal preference – You don’t have to do it twice if you don’t want to. Either method (online tool or plugin) will work well in optimizing your images.
Anyway, after optimizing and compressing your image file size, the compressed images should be at least 50% smaller than their original size.
This would contribute to an improvement of your LCP score.
Summary
In short, simplify “Above The Fold” content as much as possible:
- Make sure not to use any JavaScript-driven content in your “Above The Fold” section.
- Keep “Above The Fold” section clutter-free with only 2 images (logo & hero image).
- Compress your images’ file size and optimize all the images within the “Above The Fold” area.
If you can do all three, you should see an improvement in your LCP score.
Step #4:
Eliminate Unexpected Layout Shifts
Unexpected layout shifts are changes in the placement of elements in a webpage.
This shift can be caused by JavaScript or CSS files that are not loaded at that time and which cause pops or jumps on websites.
For instance, some elements may be shifted to a different position on the screen when you first load it. And then returns to their original position once the CSS or JavaScript loads.
Layout shifts are problematic because they can cause unexpected jumps and pops with animations and make content more difficult to read, especially if it’s scrolling off the page and you need to scroll back up again.
These sorts of changes can confuse users who are in the middle of reading or interacting with a page.
This could cause the loss of your user’s attention and interest.
Besides, you want a smooth user browsing experience. You don’t want any unexpected layout shifts to occur while they’re navigating through your site.
So how do you eliminate unexpected layout shifts?
First, you need to find out which elements on your web page are causing the layout shifts.
(please refer to my previous lesson: How to Measure Core Web Vitals using Chrome DevTools)
Alternatively, you can also refer to Google’s PageSpeed Insights results page for layout shifts.

Once the layout shifts are identified, it’s time to fix it by starting at the top of your page and working your way towards the bottom.
So, let’s get started!
1. Layout shift caused by images
If you have images that are causing layout shift, all you need to do is add a fixed height and width to the images.
img.logo { width: 150px; height: 60px; }By adding a fixed height and width to the logo, the logo’s size will stay the same, and it will no longer cause the layout to shift.
For images on mobile or tablet view, you will need to define a different size for each viewport.
@media max-width(500px) {
   img.logo { width: 100px; height: 30px; }
}
If you’re using WP Rocket, you can turn on the Add missing image dimensions option to automatically add missing width and height attributes to images:
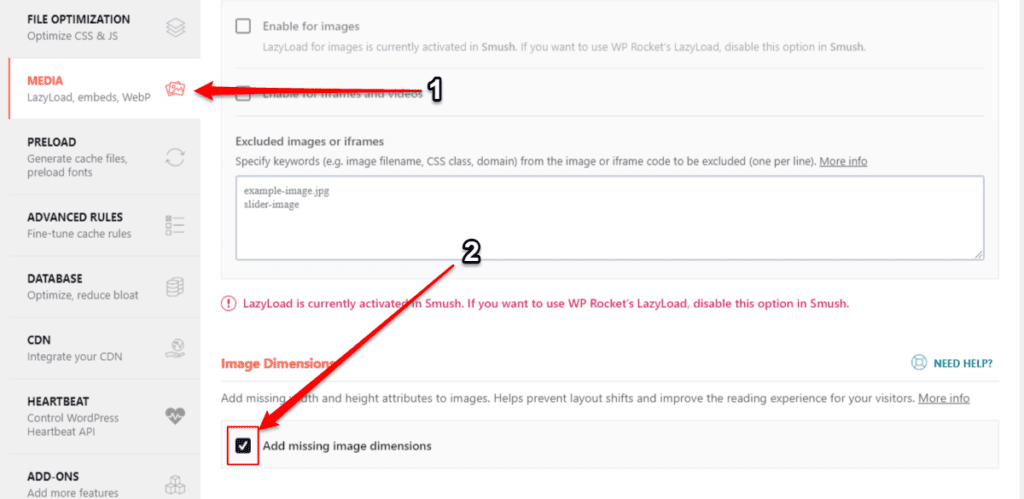
Note: This option doesn’t always work on all images. You’ll need to add the height and width manually for those who don’t.
2. Layout shift caused by iframes & embeds (YouTube, Vimeo, etc.)
Like images, you need to add a fixed height and width to all your iframes & embeds.
If you’re using WP Rocket, make sure you enable lazy loading for iframes & videos and replace the YouTube iframe with a preview image:

3. Layout shift caused by JavaScript-driven content (slider, carousel, masonry grid)
For slider and carousel, make sure you add a fixed height to its wrapper so that there won’t be any jumps or pops as slide scrolls or changes.
If you’re using the Elementor slider widget or carousel widget, make sure you add a fixed height to all different viewports (desktop, tablet, mobile).

Some slider or carousel plugin has an adaptive height option that can adjust the height of the slider or carousel based on the image height.
Make sure you turn the adaptive height option off as it would make your slider or carousel jumps and pops as the image height changes.
If you’re using a masonry grid plugin, make sure you add a fixed height to the grid container.
By doing so, your grid will no longer push and pull around as you scroll down the page.
4. Layout shift caused by Google Fonts
As I have mentioned before, Google fonts can cause unwanted layout shifts.
Here are a few examples:


The only way to fix this is don’t use Google fonts, and use system fonts instead.
Alternatively, you can also preload Google fonts, but it won’t fix the problem entirely. You’ll still see some layout shift when the Google font is loaded.
Summary
Sometimes it requires a few tries to locate the right element that causes layout shift.
Therefore, it’s essential to keep looking and take action to fix it.
While Cumulative Layout Shift (CLS) wasn’t the most significant obstacle to scoring high in Core Web Vitals, but it’s still worth taking action to reduce it.
If you’re serious about optimizing your site for user experience, you must do your best to reduce these sorts of unexpected layout shifts before they become problems that will affect your page’s performance.
Frequently Asked Questions
1. Do I need CDN?
The answer to this question is: not always.
A CDN is a network of servers distributed across multiple geographic locations that deliver web content to end users by caching content at each location.
They are not necessary for speeding up your site, especially if you want to optimize for Core Web Vitals.
CDN can introduce latency and jitter in your WordPress site due to distance and congestion, as well as increasing your costs.
For some sites, it may be worth the trade-off for additional users within a shorter period of time.
For other sites, performance issues caused by a CDN may negate its benefits. It’s important to consider your site’s specific needs when deciding whether or not you need a CDN!
To me, CDN is like doping in sport. If you need it, then your site has not been optimized correctly.
2. Do I need to compress all my images?
If you lazy load your images, you don’t have to compress and optimize all your images, particularly those in the “Below The Fold” section.
You only need to compress images that show up in the “Above The Fold” section.
To identify which images to compress, make sure you enable the “lazy load images” feature first, then scan your web page with GTmetrix.
For every image that shows up in the waterfall model, you’ll need to compress and optimize it.
Those that don’t show up, you can ignore it.
Being said that, it’s still good practice not to upload any images that are larger than 1000 pixels (width & height).
For most websites, you don’t need images that are larger than 1000x1000px. Exception for background images where you want the images to be displayed properly across all browsers.
Still, you don’t need a background image of 3000×3000px if you can get by with a 1400px.
Large images will prolong the loading time. Even lazy load can’t help with that.
So, make sure you shrink down your image size to less than 1000px before you upload it to your WordPress site.
3. Inline all the CSS is BAD! We should use Critical CSS instead.
I’m not going to sugar-coat it – Inline all CSS is a hack and very unorthodox.
However, the thing about Critical CSS is that the only way to come up with it is by doing it manually (using a preprocessor, like SASS), which is not for the faint-hearted.
This way of generating critical CSS is almost impossible for a WordPress site without custom-built everything from the ground up.
Yes – there are tools (free and paid) that automatically generate critical CSS for you. However, the critical CSS generated from those tools wasn’t always accurate.
Hence why I suggest the “inline all CSS” hack.
This hack would be useful if you don’t know how to generate critical CSS or access those paid tools.
Yes – inlining all the CSS will make your HTML code larger, which will prolong the initial server response.
However, this can be balanced out with a good hosting and caching plugin.
Again, as I’ve stated above, not all the techniques I outlined will work with all kinds of sites. It’s up to you to make the decision and choose which one is the best for you.
My job is to present all the possible methods, which are preferably free and easy to use.
4. I merged all my JavaScript files into one and delayed its execution, but it broke my site.
You may have combined some critical JavaScript files into it, which might lead to JavaScript conflicts on your site.
When merging JavaScript files, make sure you exclude critical JavaScript files from it.
You are not supposed to merge or delay critical JavaScript files. If you do that, it’ll cause JavaScript errors on your site, which will make all your JavaScript malfunction.
How to identify Critical JavaScript files?
Generally, JavaScript files that are critical are the ones that other JavaScript depend on.
The most common one on a WordPress site is jQuery.
If you’re lazy loading your images, be sure to exclude the lazy load script from merging. Otherwise, all your images won’t load.
The best way to identify critical JavaScript files is to look at your browser’s console before and after you merge the JavaScript files.
If there is an error in the console, then it means that you’ve merged some critical JavaScript files.
Sometimes, it might not be that simple to identify which JavaScript file is causing the problem. Thus you might want to exclude scripts one by one and test again.
Conclusion
So, there you have it… a complete guide on how to optimize a WordPress site for Core Web Vitals using R.O.S.E Mechanism.
It’s now up to you to go ahead and implement these techniques to improve your website performance and user experience.
I hope you enjoyed this lesson and found it helpful!
In the next lesson, we’ll go over a case study on optimizing an Elementor site using the R.O.S.E Mechanism.

